Traveling and photography go hand in hand. As soon as I began traveling with a photography kit, I learned the importance of packing it safely so that everything still works when I get to my destination. Regardless if I am travelling on business or pleasure, my camera remains my faithful companion. I definitely do not want my photo gear in the hold as checked baggage while the treatment is not gentle. Cabin baggage is usually limited (Height: 55 cm x Width: 40 cm x Depth: 23 cm at a max Weight: 8 kg, for example).
The gear you take with you will have a great impact on how successful and enjoyable your photo shoots will be.
I go for the widest possible use, lenses that I can use in most situations. Yet I do have exceptions to that rule. There are lenses I take even though their usage is narrow; they have simply earned a place in heart and in my bag. These lenses are all primes, sharp and very fast. Taking tripods is not always possible, but due to Sony’s stabilizers I can usually manage without, and if not there are many small tricks to apply when travelling.
I also consider “the discreetness factor”. Looking like the sum of a year’s payroll is not too healthy in certain places around the world. Expensive photographic equipment can easily land you in an undesirable situation where you end up losing your possessions, with the additional risk of losing your life. I usually carry my camera in a big Lowepro Pro Trekker bag when travelling though airports, but when using my camera downtown, I quickly swap to a much more neutral Crumpler bag.
Planning is a key factor when achieving success on your photo shoot. You might have the luxury of being a returning visitor, but in most cases, building on others’ experiences is essential. The first step is to determine what I will be shooting. Online resources are key in gaining an overview. PHOTOGRAPHER’S GUIDE TO SEATTLE provides much detailed info about where to shoot, when and with what equipment. I am going to shoot cityscape predominantly, but landscape photos with the Snoqualmie Falls are definitely also on the program. As I am going to be shooting in November, I imagine short and dark days, rainy, black asphalt eating up the light. Skyscrapers, moisture in the air, indoors fish market, colors at the gum wall.
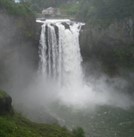 Snoqualmie Falls is 82 meters high and faces east. This is important, because showing up late afternoon will save me the bother of neutral density filters to allow long exposure. A tripod is much more necessary. And a rain jacket for my lens. This waterfall rages with so much water that it astounds you. Setting the appropriate exposure is vital, avoiding the waterfall appearing as a blob of white water without details. A cloudy sky is also to be expected, I am going to try to get high enough to shoot down on the falls, thus eliminating the sky from the shot. If the sun is out I will try to shoot wide and backlit from the river at the base. My choice of lens is likely to be the Legend 28-135 f/4. Expecting a lot of spray, I’ll have to bring a lens cloth and finally, and very importantly, my tripod.
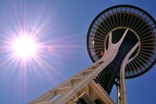 Space needle is great in the winter. I plan to visit it at sunrise or midday. I know there are some trees near the music museum nearby, and I will try to use them as a frame. I am going to use my 80-200 APO HS f/2.8 at it covers a good range for this shoot, and has the most stunning colors. I will also try to shoot it backlit. For that I will need a wide lens, maybe my 20mm f/2.8 which is wide, fast and easy to produce a starburst with.
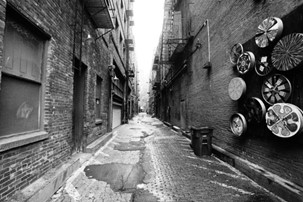 Seattle has long and narrow corridors. After the natural light settles, the sky has turned dark, and while city lights illuminate below, then high contrast shots, preferably backlit with street lamps, yield the most interesting pictures. I am planning on shooting with my 50mm. I am going to hunt for desolation in the darkness, moody shots in the downtown alleys…I expect a rainy night in Seattle to give soft reflections, shadows and a mood of seclusion.
Seattle also features a stunning and well-known skyline. For years, I have visited Seattle in late October, every time trying to make that perfect skyline photo, and failed my own expectations… maybe this year, who knows. This year I am going to try for the setting sun, maybe if the sky is interesting this year, then maybe I will get that shot.
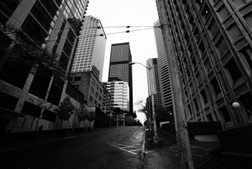 I am going to look for three-dimensional cityscape composition, leading lines, perspective, depth. I am planning for focal lengths between 17-35mm. The wide angle will allow me to capture a nice skyline without having to be miles outside the city, and let me include an entire skyscraper in vertical format, while standing near its base.
Quick Tips
-
Disassemble everything. In other words, do not leave a lens attached to your camera.
-
Do bring a lightweight rain coat/poncho strapped to your bag, rainy days really bring a wonderful challenge.
-
Pack only one piece of equipment per padded compartment; you do not want your equipment’s metal, glass, or hard plastic surfaces and edges to rub against each other when you move your bag around.
-
Customize your camera bag. Once you have a workable solution, try to keep that configuration. The reason for not changing it again is that you want to be fast and secure when fetching your gadgets. Keep the lenses and filters in the same spot, in order for you to find what you need even when shooting in the blue hour with limited light.
-
Look into insurance on your gear if you cannot afford to replace it if something happens.
-
Be prepared to unpack and repack everything when you go through security in each new country. Many security officers will want to look at everything.
-
Lastly, if you are bringing a lot of equipment with you, like multiple bodies and a collection of lenses, consider getting a carnet or filling out Form 4577 for the U.S. Customs and Border Patrol. These things can help you avoid paying tax if a country thinks you are trying to import or export equipment for sale. The paperwork you need to fill out depends on where you are going and what you are doing there.


Leave a Reply